Sunday, August 31, 2008

My First Daring Baker Challenge - Choco Eclair!


I was introduced by a colleague at work on the Daring Bakers blogroll and instantly it gave me some inspiration to go back again to my baking routine (at least once a month). My baking skills has been put on the side for sometime now due to other priorities (as usual, work is the biggest culprit!). It has been a long time also since I last posted so here is my resurrection to Blogger dashboard...

The August challenge is to make Chocolate Eclairs. The first time I read the mail i was both excited and worried. Excited because, I LOOOOVE chocolate eclairs! Worried because, the steps seem to be complicated and my confidence in baking has never been that high. For awhile I thought, being "daring" could be too ambitious but, I've never really done any baking so, why am I thinking too much?

There are 3 components in completing this recipe a.) bake the cream puff dough b.) make the chocolate pastry cream and c.) prepare the chocolate glaze. So I started out with planning (btw, this is one of my better skills) what ingredients to buy and what equipments to use. We just moved to another condo unit and it doesn't have any oven so, 3 months ago, we bought a 5-in-1 convection/convention/microwave /steamer/griller. Baking choco eclairs would be my chance to finally encounter my fear of using this machine (God knows i'm the worst person to operate these gadgets).


The challenge host specifically instructed to follow the same pastry recipe and to have something chocolate (whether the cream filling or the glaze). As a freshman in this blogroll, I decided to follow exactly the given recipe and maybe just sprinkle some nuts on top to create a difference (the recipe is based on Pierre Herme's "Chocolate Desserts" and i'll tell you more about it in a little while). So I have the ingredients, the equipment, the recipe, and the positive attitude that I can conquer!


It took me 2 days to actually complete. The first day is an "opportunity for improvement" and the second, is the final verdict. My hours in the kitchen was equally challenged by the tug-of-war I'm having with my toddler because he wants to be the daring baker himself ( i regret i didn't have a video on this one). Going back to day one, I had a couple of shortcomings on the following (1) My puff pastry is too small. It is too small in fact that i cannot slice it into half to put the choco pastry cream inside. I followed the suggested step of using a pastry bag fitted with a plain tip nozzle to create chubby finger shaped pastry but somehow I created tiny fingerlings:-) (2) My choco pastry cream is like choco water with floating eggs! I did not get the technique of "tempering" (mixing raw eggs with hot milk) and also I thought the solution is still very hot (that's why the floating eggs) that I did not bring it back to low heat to dissolve the cornstarch and thicken the sauce. The worse thing is, I have been so unfit that i cannot withstand whisking the solution vigorously (it says without stopping, how could any human possibly do that?).


I had to avenge my frustration the following day so I woke up early and decided to start again. Luckily, i had an early foresight for the worse case scenario so I put aside 1/2 portion of the puff dough in the freezer ( told you, planning is one of my better skills) . My focus on day 2 is to make the pastry cream right. After careful tempering and vigorous whisking (whew!), I finally got it! I feel so elated that I almost shouted "Eureka!". The shape and size of my pastry dough has also improved. Instead of using the pastry bag with the nozzle, I placed the dough in a clean sandwhich bag, pushed it on one edge, cut the tip and drawn the right shape of the dough to the baking sheet. I was also proud with how the dough "puffed" up considering that, I don't know how even was the temperature in the oven. While waiting for the cream puff and also cooling the choco cream, i worked on the choco glaze (while my son was busy licking the chocolate). When everything is done, the final step is to assemble the product so, I opened up the cream puff into half, piped in the choco cream, placed the other half of the cream puff on top, dipped in the glaze (i dipped it upright to avoid the mess), placed the almonds on top of the glaze, chilled it in the fridge while i looked for batteries to ready my camera for my first daring bakers blog and whooah! here come's my son with (at the speed of lightning) already enjoying his first chocolate eclair...
P.S. As I am on a deadline to post this by today, I opted to just blog here the experience rather than outline the recipe itslef. If I have the time, I will re-post this to include the more detailed recipe. If you're dying to get the recipe :-), a better alternative would be, to join the gang at Daring Bakers!

Saturday, November 18, 2006

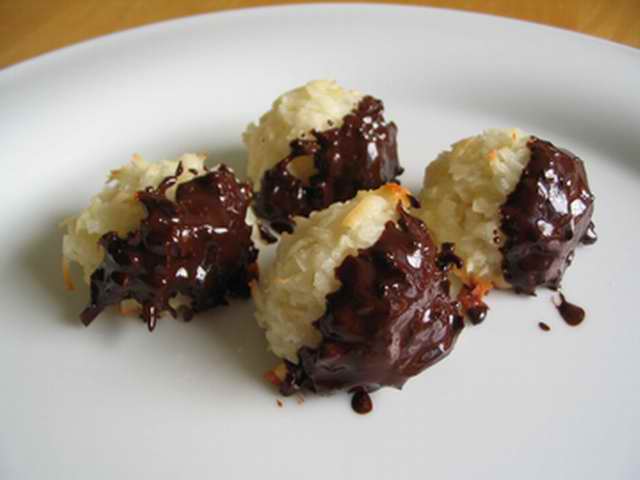
Coco Macaroons in Choco Dip


It has been a long time not to publish anything, my time at the office has been killing my cooking creativity for some time.

Recently, an officemate has just invited my family for an afternoon break at his new condo ...some sort of "house warming" i call it. I thought of baking a very simple treat, here's a quick easy to cook recipe which i just followed from the package label of Baker's Angel Flake Coconut.


Ingredients:
1 pkg (7oz or 2 +2/3 cups) Baker's Angel Flake Coconut
(alternatively, dessicated coconut from other brands)
1/3 cup white sugar
3 tbsp flour
1/8 tsp salt
1/2 tsp almond extract
2 egg whites
2 0z (4 squares) Semi sweet Baking Chocolate

1. Mix coconut,flour, and salt in large bowl.
2. Beat the egg whites,gradually adding the white sugar until it forms a foamy but firm whisk. Add the almond extract until well blended.
3. Stir in the coconut mixture into the egg white mixture.
4. Form balls (into tablespoonfuls) unto greased and floured cookie sheets.
5. Bake at 3250F for 20 mins or until edges of cookies are slightly brown.
6. Remove from cookie sheets into wire racks. Cool completely.
7. Melt the chocolate (follow package instructions).
8. Dip cookies halfway into chocolate, dripping off the excess.
9. Let stand at room temperature or refrigerate for a few mins until chocolate is firm.

Makes about 18-20 cookies.

Sunday, January 08, 2006

Kutsinta (Glutinous Rice Flour Cakes)

Kutsinta is an old favorite in the Philippines along with "Puto" (rice cakes). I have long been ambitioning to make this recipe but could not find any lye water sold here in Singapore (or, i just don't know where to find this ingredient). Luckily, my cousin-in-law went back to Philippines and brought back some lye water and plastic moulds for us to use. And so it goes, this is our first episode of "kutsinta". Enjoy!

This recipe is derived from Reynaldo Alejandro's,book, "Authentic Recipes from the Philippines". I have reduced the original recipe into half, serving about 24 pieces.


Ingredients:

1 cup rice flour
3/4 cup brwon sugar ( or 1 cup if you want it sweeter)
1 1/2 cups water
1 tsp lye water
pinch of red coloring (if desired)

1. Mix rice flour and water. Add sugar and lye water into the flour mixture until well blended. Add a little coloring.
2. Spoon the mixture on small muffin pans or plastic moulds, 3/4 full.
3. Steam for 30 minutes or until a toothpick inserted into the rice cake comes out clean. Add more water if needed until the rice cakes are firm and fully cooked.
4. Remove from the molds. Serve with fresh grated coconut.

Monday, January 02, 2006

Embutido (Stuffed Pork Roll)

It is the holiday season again and the past few days has been tiring for me touring my Mom & my brother in Singapore during the day and preparing meals for the family in between. I was thinking of a recipe that can be prepared once but stored for a couple of meals. I came across this favorite delight, Embutido (stuffed pork roll) from Nora Daza's cookbook and gave it my first attempt. I find this very easy to prepare and practical for busy moms. My first try was not too bad at all, i got a good rating from my carnivore brother!


Ingredients:

1/2 k ground lean pork
1/2 c vienna sausage,diced
1 1/2 tsps salt
1/4 tsp pepper
2 tbsps all purpose flour
1/4 c sweet pickle relish
2 raw eggs,beaten
2 hard cooked eggs
2 pcs chorizo de bilbao (pork sausage),diced
1/4 c raisins
Aluminum wrap


1. Combine ground pork,vienna sausage,pickle relish, season with salt and pepper.
2. Beat 2 eggs and add to the meat mixture,then add flour.
3. Spread meat mixture on an 8"x10" aluminum wrap, with allowance of about 2" on each side.
4. Arrange slices of hard cooked eggs, pork sausage, and raisins on top of the meat mixture.
5. Roll in aluminum foil closing the ends firmly.
6. Bake at 180C for 1 hour and then put aside to cool at room temperature.
7. Chill in the fridge for at least 3 hours.
8. Before serving,remove the aluminum foil and slice. Makes 2 rolls.

Tuesday, November 29, 2005

Maja Blanca

We got invited to an early Christmas party and I thought, since most of the guests anyway are Filipinos,might as well bring something Filipino for dessert.

Maja blanca brings back memories of my school days, I have always loved buying this yummy food at the school canteen each time the teacher calls for "recess". Although I find that my good old Maja favorite before is not as creamy, this recipe promises to be rich with "gata" or coco milk.

To give it a "pica-pica" party appeal, i used our decorative ice cube trays to mould, making it bite-size,ready to eat.

This no-bake recipe is easy to prepare, even children can do this at home (with supervision).


Ingredients:

1 cup corn flour
500 ml of coco milk (available in tetra pack from supermarkets)
150 ml of sweetened condensed milk (you can add more if you like it sweeter)
1 cup water
1 can (Del Monte) cream-style corn
butter to grease

1. In a large pan, dissolve 1 cup corn flour in 1 cup of water until homogeneous. Add the coconut milk followed by the cream-style corn.
2. Set to medium-high heat and cook the mixture,stirring constantly until thick.
3. Set the heat to low setting and slowly add the condensed milk until it is evenly distributed to the mixture.
4. Pour into a greased mould or a ceramic dish and leave it to cool for 30-40 minutes. You can also chill it for another hour before serving.

A couple of learnings:

1. When putting it in a mould,make sure there are no trapped "air bubbles" to avoid seeing small holes when you un-mould the tray (see picture above).
2. If you are sensitive to coconut milk, reduce the suggested amount and substitute with some amount of water when mixing to avoid a very lumpy mixture.

Saturday, November 26, 2005

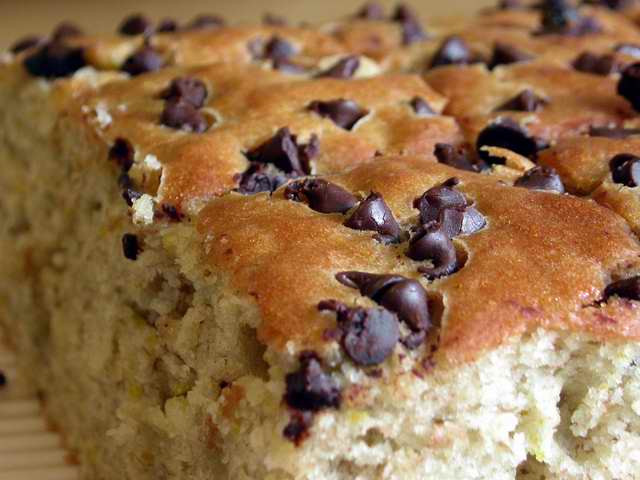
Banana Bread

This tasty bread is a product of leftover bananas in my kitchen. I bought the bananas for my baby EJ but the big bunch of Del Monte pieces are more than enough for a 5 month-old to stomach.

So, here comes a basic recipe of banana bread with a twist of orange peel & chocolate tidbits on top. This is best served hot to savor the sweet smelling orange and the chocolate melts in your mouth, hmm...yum,yum!


Ingredients:

1 1/2 cups all-purpose flour
1 1/2 tsps baking powder
1/4 tsp baking soda
1/4 tsp ground cinammon
1 egg
1 cup mashed nananas (2 large Del Monte bananas)
3/4 cup sugar
1/4 cup cooking oil
1 tsp finely shredded lemon or orange peel
1/2 cup chocolate tidbits (nuts can also be an alternative)

1. Grease an 8x4x2-inch loaf pan and set aside.
2. In a medium mixing bowl combine all the dry ingredients: flour, baking powder,baking soda,cinammon, add a pinch of salt.
3. In another bowl combine the wet ingredients: egg, sugar, oil & banana. To ensure consistency, I used a hand mixer and added finely shredded orange peel.
4. Add the wet to the dry mixture and stir until homogeneous. The texture of the batter is typically lumpy. Add the choco tidbits on top or you can also fold in nuts.
5. Transfer batter into the prepared pan. Bake in 180C oven for 50 to 60 mins or till a wooden toothpick inserted near the center comes out clean. Cool the pan,remove the loaf and set aside on a wire rack.

Makes 16 servings.

A couple of learnings:
  • For the fullest aroma, allow the bananas to really ripen almost turning into dark color.
  • If you wish to make this bread moist, you can add about 1/4 cup of milk but watch-out in making the batter too runny in texture, the bread will not rise very well.

Friday, November 25, 2005

Introduction


This is my brave attempt to have a blog site to post what possibly might be useful-to-share recipes straight from my kitchen. I am no trained cook, just cooking hard from everyday experience.

I thought, I must be NOT ALONE in this planet juggling between work and taking care of a family. So hopefully, this site will be useful to Supermoms like me :-) Here's a record of what's happening in My Kitchen, hopefully, this blog site will serve other families well.